
-2.png#keepProtocol "Methods to Construct an AI-Powered Journey Assistant to Verify Flight Standing")
Step One: Create the Assistant
To construct your Journey Digital Assistant, observe the steps beneath. When you have already created your digital assistant, skip to the subsequent step.
- On the touchdown web page, click on New Bot.

- Within the Create New Bot window, choose Begin from Scratch.
- Enter a Title.
- Choose an icon or click on the + icon to add your personal. Photographs must be in PNG format and mustn’t exceed 40×40 pixels. The file measurement is restricted to 80kb.
- Choose Journey Administration because the Objective of your VA.
- Select Customary Bot because the Bot Sort.
- Choose the Default Language.
- Click on Proceed when prepared.

- Subsequent, you’ll be able to generate use instances in your new Clever Digital Assistant. Add a significant description and click on Get Use Instances to generate intents that shall be mechanically added to the IVA. You’ll be able to replace the Bot Title and Objective and take away use instances.
- Click on Create to create your IVA with generated use instances, or click on Create with out Use Instances to create your IVA with none generated use instances.

- Wait just a few moments in your IVA to be configured. As soon as finished, you’ll be able to proceed growing it. When you have chosen to generate use instances, you will see that them as Dialog Duties.


Step Two: Create a Dialog Activity
After creating your assistant, you might be directed to the Bot Abstract web page. Step one is so as to add an Intent Dialog to help numerous business-specific use instances. The Intent Dialog is step one within the user-IVA dialog movement.
- On the Duties widget, click on + New Activity and choose Dialog Activity.

- On the Create Dialog web page, enter the next particulars:
- Intent Title – Enter the Intent identify. That is the phrase that triggers the dialog. The intent identify have to be easy and less than 3-4 phrases. For instance, Verify flight standing.
- Beneath Extra Choices, you’ll be able to add a description and different dialog-related particulars. Allow us to retain the default settings.
- Click on Proceed.

- When prompted to improve to Dialog Pushed Dialog Builder, choose Improve. For directions on the Legacy Dialog Builder, refer right here.
- As soon as your activity has been created, you will notice the Dialog Builder Canvas, with the primary node displayed – the Intent Node, which receives the identify of the duty and represents the primary node throughout the Dialog Activity. Be taught extra about working with the Dialog Builder.


Step Three: Create the Nodes
To permit the IVA to have the ability to seize journey and consumer data, seek for flight particulars utilizing APIs, and show a selected message with the flight standing. Then nodes need to be created.
The next nodes will should be created:
- a Consumer Choice Entity node to assemble data from the consumer.
- a Service Bot Motion node to get flight data.
- a Flight Choice Entity node to seize the flight quantity for standing particulars.
- a Script node for customized JavaScript to extract the chosen flight particulars.
- a Message node to show a message with the flight particulars to the consumer.
- an Error Message for when the consumer offers enter that can not be recognized by the IVA.
For detailed step-by-step directions on every of those nodes, go to the Kore.ai documentation web site on Create a Journey Digital Assistant.
Step 4: Add Occasions
After the nodes and messages are constructed, the assistant is prepared for consumer enter. To ascertain a flight standing occasion as quickly as a brand new dialog is began between the consumer and the IVA, you will want to make use of an Occasion Handler. The Occasion Handler will provoke this activity each time a brand new connection is established from the Internet/Cellular SDK. Be taught extra about Occasion Handlers.
- Shut the Dialog Builder to return to the Dialog Duties web page.
- From the Left Navigation pane, and choose Intelligence > Occasions.
- From the occasions checklist, click on Configure in opposition to the On Join occasion.
- On the On Join window, by default, the Provoke Activity choice is chosen; retain it.
- From the drop-down checklist, choose the Get Flight Standing activity.
- Click on Save.

-2.png#keepProtocol&description=Methods+to+Construct+an+AI-Powered+Journey+Assistant+to+Verify+Flight+Standing)
Step 5: Check the Dialog Activity
To check the Dialog activity, you should use the Discuss to Bot choice on the backside proper. Because the onConnect occasion is configured, the dialog is mechanically initiated. Alternatively, you’ll be able to at all times strive the next utterance (intent identify) Get me the flight standing.
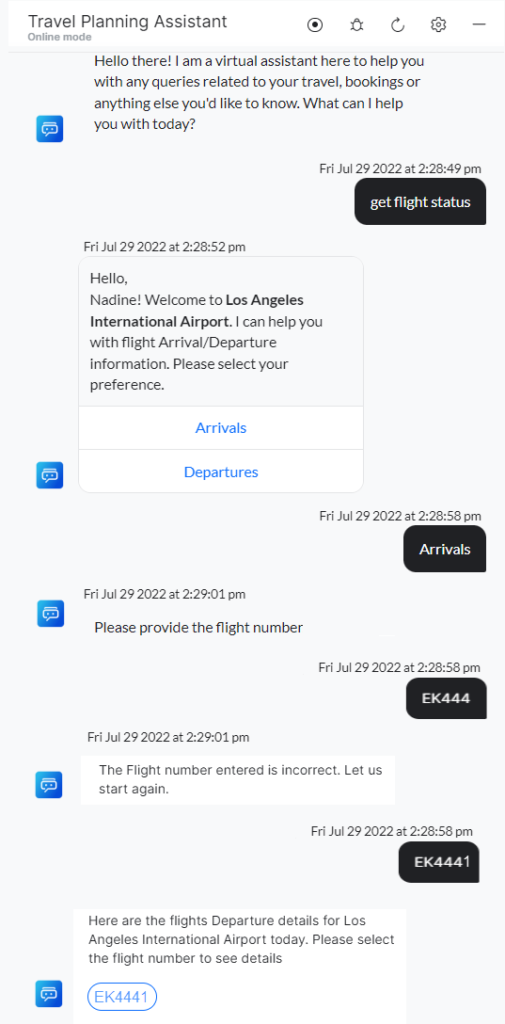
Comply with the directions:
- Choose Arrival / Departure.
- Enter an invalid flight quantity somewhat than choosing one of many prompts.
- You’ll be able to see the suitable error message and be prompted to enter the flight quantity once more.
- Choose a flight quantity from the prompts.
- You’ll be able to see the flight particulars in a tabular format.
You may have efficiently created and examined your first Digital Assistant.
Wish to Be taught Extra?
We’re right here to help your studying journey. Able to tackle bot constructing however undecided the place to begin? Be taught conversational AI abilities and get licensed on Kore.ai Expertise Optimization (XO) Platform.
As a pacesetter in conversational AI platforms and options, Kore.ai helps enterprises automate entrance and back-office enterprise interactions to ship extraordinary experiences for his or her clients, brokers, and staff.
![]()